
Imagine you’re out on a 3 day hike with some friends. The weather is good, the scenery is amazing and you’re making great time towards your destination. You have a digital SLR camera in your heavy multi-day backpack so you can show friends and family at home the myriad of colours you’re passing through. Every time you plod around the corner to another picturesque spot the same thing runs through your head.
“Wow, I should take a picture of that.”
“All I’d have to do is put down my 40 pound backpack, open it up, move things around to get my camera out, get it out of it’s pouch, take the lens cap off, turn it on, take a few photos, turn the camera off, put the cap back on, put the camera back in the pouch, put the bag back in your backpack, adjust your backpack, heave the 40 pounds over your shoulders, re-adjust your straps, make sure you haven’t forgotten anything on the ground and hustle to catch up with your friends who have already started moving.”
“Umm, on second thought, I’ll just remember this one and take a photo at the next stop.”
100 stops later and all you have photos of is camp and your friends eating lunch. Are those the epic photos you wanted from this trip?
That fancy digital SLR camera you bought to take amazing photos of scenery is sitting in your backpack the entire time because it’s a lot of work to take your bag off, take some photos and put it back on.
If there was only a way to keep your camera out all the time but your hands free so they can help you along the trail.
The Problem: That camera doesn’t leave your backpack
The Solution: The StrapShot
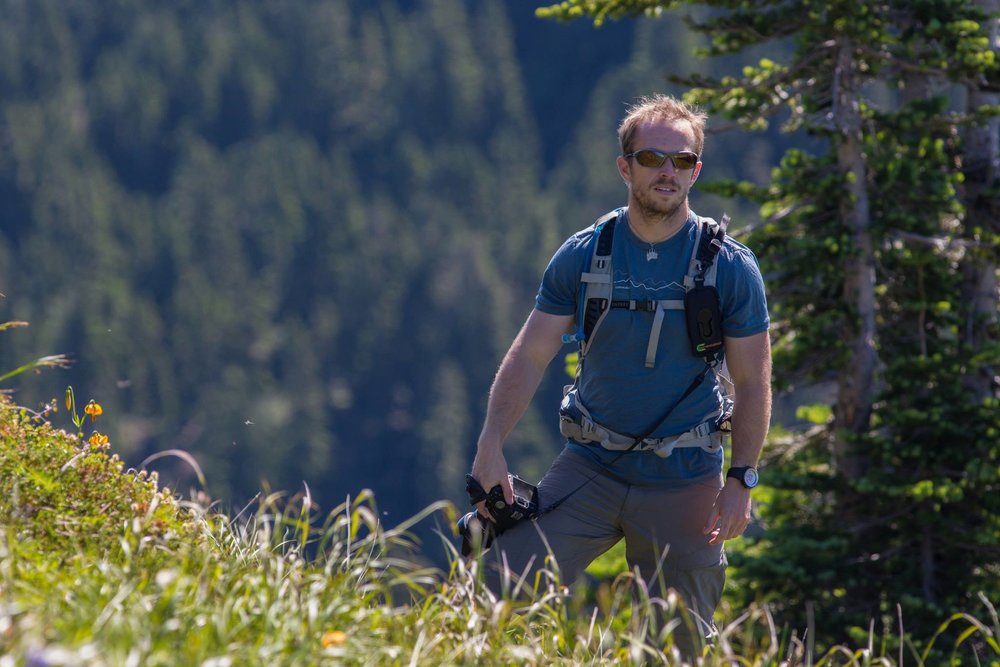
Strapshot on an Osprey Talon
The Cotton Carrier Strapshot is a camera holder that easily attaches to one of your backpack straps. A small clip goes into the tripod mount on your camera which connects to the holder on your backpack strap. The Strapshot velcros around the backpack strap and clips or ties to the bag near your shoulder to prevent it from sliding down. The camera sits securely on the front of your chest to one side, ready for taking photos.
Your backpack strap is an ideal location for your camera because it’s so easy to access. There’s no taking your pack off, there’s no awkward stretching to reach behind you, and you’re not likely to smash your camera into anything.
Every time you want to take a photo it’s a very quick process instead of the long drawn out endeavor that you had to go through at the beginning of this post to get your camera out of your pack.
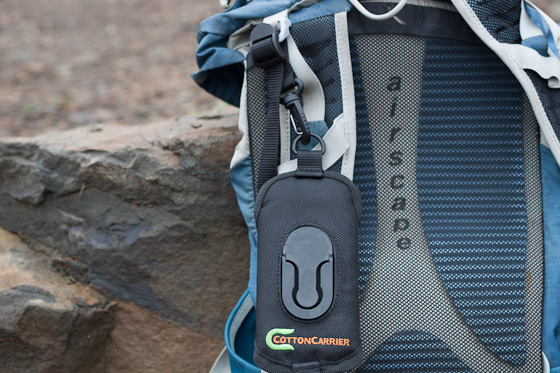
It’s also nice and secure. When the lens on the camera is pointing down, it’s locked into the clip. When you turn it to one side, it unlocks and you can slide it out of the clip. This is the same kind of mount they have on their chest harness. A painless one-handed operation. They also include a tether just in case.
When you’re camera is accessible within seconds, you’ll be ready to capture anything that happens on the hike. Need a shot of that beautiful scenery before your friends start hiking again? Done. Need a shot of those animals scampering off into the wilderness? Done. Need a shot of your friends face-plant in the mud? Done.
Strapshot
Strapshot
Pros to the Strapshot
I like the Strapshot because it’s lightweight and makes the whole picture-taking process much easier. Here are of the things I liked about the Strapshot:
- It’s small and light – It doesn’t add much weight to your gear. Some of the chest mounted pouches and straps are much heavier
- It’s secure – I never had a problem with my camera coming out but there is a tether just in case. The camera has to turn 90 degrees for it to pop out of the base and fall.
- It’s easy to set up – Just put the velcro around your backpack strap and attach the webbing to the shoulder on your pack. Done.
- It’s got small footprint – It doesn’t cover up any more space on your body than your backpack already does. I liked this hiking in the heat of the summer where larger chest mount straps and pouches take up a lot of room and trap the heat and sweat against your body.
- This mount fits perfect for the one strap, cross shoulder bags like some of the camera sling bags. The only place to mount a camera on those is on the strap.
Cons to the Strapshot
There are some downsides to the Strapshot. They’re usually a result of the unique designs, and you won’t get the Pros I listed above without some drawbacks.
- It can be lopsided – Being on one strap and off to the side it can feel a bit lopsided. The bigger your pack and the smaller your camera and lens, the less this will be an issue. With my Osprey Talon 33 litre backpack and a Canon T1i with 18-200 lens, I didn’t have a problem with it. It was a bit awkward for my dad with a smaller backpack and Canon 7d camera with the 70-200 lens (a larger camera and lens).
- It comes off with your backpack – One of the benefits to the chest mount straps and camera pouches is they stay on after you take your backpack off. During breaks, you can take your pack off and still have your camera with you. With the Strapshot, your camera stays with the backpack. This is still a better situation than never seeing your camera because it’s hidden in your pack. Just don’t forget about it before you throw your pack on the ground!
- It can get in the way of your arm – Because of where the mount was on my camera, I could only put mine on one side otherwise the lens pointed out and I would run into it with my arm.
- No protection from the weather – You can get covers for the lens and camera though.
Wrap-up
The Strapshot is a great little camera holder if you need something easy to set up and lightweight. If you have a one-strap sling bag, the Strapshot is definitely the way to go.
On the other hand, if you’re looking for chest mount options or better mounts for larger cameras, check out the Cotton Carrier 1 Camera Vest and the other options in 5 ways to carry a DSLR camera on outdoor adventures.
More Links
5 ways to carry a DSLR camera on outdoor adventures
Leave a comment! Have you tried a Strapshot? What do you use to carry your camera?
[…] Don’t miss a chance to win a Cotton Carrier Strapshot. Read the review and enter the contest now! […]